This post first appeared on Edudemic.
One of my favorite Google Apps resources is Google Calendar. If your school has enrolled in Google Apps for Education, it is part of the GAFE suite of tools. With a Google Calendar, you can more effectively organize and plan your class. Here are five quick tips to help you create an enhanced classroom Calendar to make your school year run smoothly.
Embed Calendar on sites
Consider embedding your Google Calendar directly into your website as an an easy way to publish homework, communicate deadlines, and keep students and parents up to date about your class. If you use Google Sites for your class home page, then you can easily embed a calendar by going to Insert → Calendar. However, even without a Google Site, you can use an embed code to post it. By clicking on “Calendar Details” (visible when you click the down arrow next to your calendar), you can scroll down, copy the “embed code,” and then paste it directly onto your website. Google Calendar will even let you personalize your calendar by customizing the color and shape.
Have students subscribe to Your Class Calendar
Instead of having students visit the calendar regularly, have them subscribe to it. A subscription will connect them directly to your calendar. This way, they will have the most recent and up to date information. They can even sync that calendar to their computer, tablet, or smartphone so that they have the information at their fingertips. There are two ways to subscribe to a Google Calendar. First, when viewing the calendar itself, students can click on the “+Calendar” icon at the bottom right. They will then be redirected to their own Google Calendar and prompted to add it to their own.
However, if the student prefers to use another Calendar Reader (such as iCal or Outlook), then you can share with them the Calendar address by going to “Calendar Details” and then scrolling down to “Calendar Address.” Students can then import the Calendar to their viewer of choice.
Add Attachments to Events
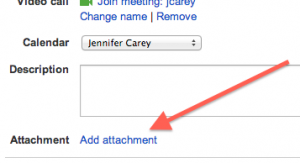
 If you like to use Google Calendar for assignments, then know that you can also attach documents - creating a great workflow solution for your students. This is a feature that requires you to enable “Labs” in Google Calendar. Labs are features that have not yet been broadly rolled out and are still in beta. It is important to know that sometimes Labs features are buggy. If you experience problems, simply disable Labs. To enable the “Event Attachments” Lab click on the the gear in the top right corner, then select Labs; scroll down and enable “Event Attachments.” Now when you create a new event you will have the option “add attachment” available. When your students view the calendar details to see their assignment, they can also access the content that you post.
 Schedule a Video Call
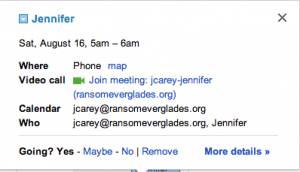
If you are scheduling an appointment with someone who also has a Google Account, then you can automatically set up a video call! By creating an event and inviting a guest, they will have the option to join your video call by clicking on the icon within the appointment. This is far easier and faster than setting up a Google Hangout or Skype Call.
Set up Appointment Slots
Google Calendar allows you to set up appointment slots without sharing your whole calendar with students. This is a great way to organize student or parent conferences without a signup sheet or emailing back and forth. Note that you can only use this feature with a Google Apps for Education (GAFE) or Business account; it will not work on a personal account.
When you open your calendar, switch to Week or Day view. Click on your Calendar anywhere and select “Appointment Slops” from the pop up bubble. From the drop down menu select the Calendar you want to use. I recommend using your professional calendar so that you don’t schedule a conflicting event. Remember, sharing appointment slots will not reveal your whole Calendar, only the time slots available for appointments. Give your Appointment Slots a name, such as “Ms. Carey’s Office Hours,” and set the times for your appointments. When you have finished, copy the appointment page URL and click save. When you share the URL with your students they will be able to schedule appointments with you. If you would like a step-by-step tutorial, check out this great video by Google Gooru
Google Calendar is a highly versatile tool within the Google suite of apps. With these tips you can streamline and organize your class and professional time, keep students on track, and navigate your schedule easily.
To learn more about using Google Calendars and other Google tools in the classroom, EdTechTeacher will be hosting a FREE, LIVE Back-to-School with Google webinar on September 18th at 8:0pm EST. Registration is open.


